Wednesday 10 October 2012

Green Screening/Keylight in After Effects


After filming our pieces against the green screen, we put the footage into After Effects (CS6) to finish the green screen effect. Instead of doing the usual Chroma key style green screening, we used the Keylight effect, which is just the more professional way of doing it.


Camera Tracking

 
This is a rough example of camera tracking. The video os a lot shorter then it should be due to some uploading issues.
 
This was put together in After Effects CS6 and is really simple to do.
After importing your clip and trimming it to the size you want. Right click the clip and hit 'Track Camera'. This will take a few minutes to render and once done you will have a red circle, to choose where you want to track round and place your text.
Onc eyou choose your spot, right click and choose the track camera with text option.
You can now add your text and change its position on the x,y and z axis's.
The text is already 3D, although you need to put the motion blur on and play with the extrusion depth to make it look more 3D.
I have added a light to my project for effect but this isn't necessary.


Thursday 2 February 2012

Quiz made using Variables

This is just an example quiz I have made using the skills I learnt about variables and the hit test in Flash. The quiz is made up of 4 questions all drink and university related and once you have answered all the questions you are taken to a overall score page.
Making the quis is actually very simple. The colour scheme of mine is appalling but all the work is in the positioning on the timeline and the coding.

Playing with Lighting on 3D text


1) After creating a new composition you firstly create a blue solid. You can either have this behind the text or underneath like I have made it. You can make it underneath by simply rotating it on the x axis. You also need to make this a 3D layer. This option is in the timeline next to where it says Solid layer.
2) You next make the text layer. After writing in your text you need to also make it a 3D layer. For my composition I made two text layers and placed one slightly behind the other on the Z axis. This is just to give the text more of a 3D look. It doesn't look that great at the moment, to really achieve the 3D look I would need to duplicate the text layer more times.
3) You can next add your light layers. With these you can choose the colour and type of light you want on the text. The different types of light are spot, parallel, ambient and point. I chose to use spot for mine. You can also play with the intensity of the light, the cone angle and the cone feather.
4) Using the orbit camera you can move around the text and place the light where you want it, either behind or infront of the text. If you want the text to have a shadow when the light shines behind or infront you need to go into the timeline on the light and text layers and check that 'casts shadows' is set to 'on'.
5) You can now add more lights if you wish. I have three on my example which gives my text a real 80s look.
6) I added a camera layer to my composition and made so if you played it the camera moves across the text and then zooms in at the end. For this I had to add keyframes on the timeline in the camera layer.

Monday 23 January 2012

Collision Detection - Hit Test in Flash

1) Make 2 layers. One named AS and one called circles. On the layer named circles draw 2 circles of different colours. Convert both to symbols --> movie clips.

2)Name one circle circle1 and the other circle2.

3)On the AS layer, hit F9 to do some coding.

This means you can drag Circle1 around. To be able to drag circle2 copy and paste the coding, changing 1 to 2. To check these work hit Ctrl + Enter to preview it.

4) After the above coding. Write this. This is for the Hit Test.

5) Add a new layer called page 2. Add a keyframe into the 2nd frame and write a 2 on it. Make sure the other layers are only 1 frame long. Now to make the jump to the 2nd page when you drag one of the circles over the other circle you need to add some more coding.

Now you should go from a page with 2 circles to a page with a number 2 when you drag and drop one of the 2 circles over the other one.

Variables on Flash

1) Open Flash in Actionscript2.

2) Name your first layer AS (for action script). Then make a new layer and name it button.

3) In the layer named button, make a circle. Right click on the circle --> convert symbol --> movie clip. Also rename it button.

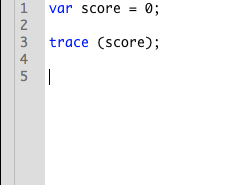
4) Make sure you have the AS layer selected on the Timetable. Then click F9 to get up the Actions option. Here you can do all your coding. The first piece of coding will be...
var stands for variable and creates a new variable.
If you see a //at the beginning of a line in the coding it is commenting it out. Meaning it will ignore that line of the coding.

5) Click on the button and name it in the top right hand corner under Properties where it says Instance name. Click back on the Timeline on the AS layer to carry on coding.
6) This piece of coding means that everytime the button is clicked it will move 5 pixels to the right. I will comment this out but it is just a good example of what ou can do. The coding also means that everytime the button is clicked the output number will go up by 1.
7) Now after the button is clicked 9 times the output goes from saying numbers to saying 'true'.

8) Now when the button is un-clicked or clicked less then 9 times the Output reads 'false'.


9) You next enter a text box onto the AS layer. In the Properties section make sure the text box is a Dynamic Text. You then go into the Options and in the Variable section write score.
Now when you you Ctrl Enter to preview the button working the text box shows the score number.

Making a 3D moving image in After Effects

You need to open Photoshop in these settings and give the image a name. The only setting you will need to change is the preset to 'Film & Video' and size to 'DVCPRO HD 1080p/29.97'. Then click OK.


Making an image in Photoshop with layers to convert it in After Effects into a 3D moving image.


You can also make the image go in and out of focus and move by adding keyframes on certain options on the timeline. I played with the aperture, depth of field and the focus distance.